Friday, September 28, 2018

Hooking up my RCA RPJ116 projector to my iPhone and Apple TV

What a boring title.

Warning this post has tons of unimportant details, but what can I do?


Alright, I know I haven't posted a blog in a bit, but meh..... Life happens. A few months ago ( which I mean like a year ago) we bought the RCA projector on sale.
Its a very inexpensive, no frills type of projector. But the price was right and we had been talking about getting one. The thing we liked was we could hook up our Apple TV to watch movies during the summer. ( Spoiler alert: we didn't watch any movies outside this summer, the reason for this blog) When we got it home, we hooked it up to the Apple TV and we were excited, because it was 'working', ie we could see the movie but not hear it. One issue with this projector, there is so little about it online and the manual leaves lots to be desired. So I couldn't figure out how to get the sound to work. We packed it up and pretty much forgot about it. Then I went on a business trip, we moved to a new house etc.. Well we finally decided to pull out the projector because my husband was like we could have a movie playing at our daughter's birthday party. oooookay.

This seems like a cool idea and I'm like YEAH! One problem, my in-laws do not have wi-fi ( we don't talk about it, its just how it is LOL. I swear there is a point to this post!!! ) So we would have to use a phone to play the movie. NO BIG DEAL right? Um very big deal. I still hadn't figured out why I had no sound on the Apple TV so still have to figure that out. 

I decide to spend the next few days troubleshooting the issue. I used to be in tech support. This is my area, I CAN DO THIS! So I bring out the projector, I hang out in the loft and I connect the Apple TV to the projector. I figure I'll start there ( plus I have no way to connect the phone to the unit). You can picture it, I have it on the floor, with all these cords connected because I'm too lazy to move it to the proper place. I'm googling like a mad person because I'm like how do I get sound. Now you can find directions for sound on devices like PS4, Roku, etc.. But nothing for apple products. I finally figure out you have to go into the settings of the Apple TV and change the sound to very basic sound. Then it will play. Mind you I did this on my older gen device, not the newest one. So success I can get it to play the movie AND the sound from the projector. 

Now this does me no good for the party, so I realize I need to get an HDMI to lightning connector. And I have no time for Amazon, so I go to Best Buy and grit my teeth and fork over the $50 for the stupid apple brand connector. I'm still annoyed by it if you couldn't tell. So I get home, I connect the phone and attempt to play Coco on the projector from iTunes and Netflix. No sound. F.M.L.  I'm about to return this $50 connector and say too bad. But I realize I can't. I should mention the speaker worked on other apps so clearly there is an issue with these particular apps. 

As I stated earlier, Google only gave me a few options and none of them relate to the iPhone or Apple products in general, so I'm flying blind. I mess around and realize I can get the movie to play in Spanish or in English with Audio description, but not just regular English. I also can get a much older movie ( Stand and Deliver) to play with zero problems. So I've pinpointed that like the Apple TV it was the sound was too advanced for my basic projector. Alright, I'm getting somewhere. I hop on chat with Apple to see if there is a setting I am missing. I'll spare you even more details, but essentially I got in a fight with the Senior Tech who said it was a Copy Right issue, and I was like:


But he was stuck on this, so in the end he was useless. Back to Google I go. I find a video where a lady hooked up a bluetooth speaker to a transmitter to play sound from her laptop. But she did not say how she did this. 

Bluetooth direct from the phone or device does not work, because it is already playing using the HDMI cord, but the sound is too good for this super basic projector. In the video mentioned above, the lady had a bluetooth transmitter, but again no idea on how to connect it. I realize I remember seeing a bluetooth transmitter at Was-Mart a while back and think I'm already $50 in lets see what else I can do. I head to the store and find one for a whopping $8.88. YAAAAAS. 

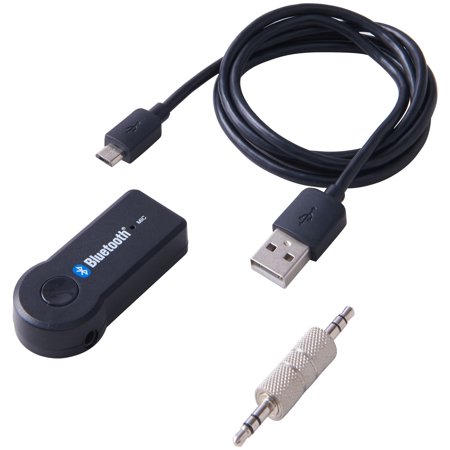
I'm still unsure how to get the sound out, but I figure I can do this. I take it home, charge it and try again. I figure out you need to connect the bluetooth transmitter to the speaker directly. Not the projector. Then when you are playing the movie, you will click on the audio options and one will be the bluetooth symbol and the device, click and BOOM sound. 

I didn't take pictures of the exact screen, my apologies, and I'm mostly writing this up for people who might be searching for advice and couldn't find anything using google,  such as me. And considering Apple won't have much information for you and will refer you back to RCA or if you get a very rude unknowledgeable agent you'll be more frustrated. I have some pictures of where you would click within Netflix app, but not what you would see. 

In this picture you will click the box highlighted in the corner. Fun Fact, Netflix can tell when you are taking a screenshot or screen record and blacks out the movie/TV show. 

In this picture, any devices you can stream to will be shown. When it is connected via HDMI it should say dock connected and if there is a bluetooth device available it will show as well. Clicking on the bluetooth device won't disconnect you from cord connection, just allow the sound to play to the bluetooth connected device. 


On most devices there are advanced sound settings, but on phones there usually are not. So you will need the bluetooth transmitter and external speaker, but after that. Golden. 


Here is a short video of the what the speaker looks and sounds like connected. This was taken during the day, so the video quality is crap, but you only need to focus on the speaker part. 


Tuesday, September 23, 2014

DYI: Centre Pull Ball of yarn.

How to make a centre pull yarn cake without a yarn winder.

Ever wish you had a yarn winder for all those bits of skeins you had leftover? And then spent a few agonizing moments trying to make a ball so you can keep them somewhat organized? Well I stumbled across a wonderful way to make a centre pulled yarn cake without a winder. You will need some simple tools. Get a pen and paper because you want to be ready. I'll wait...... Ok you good?
You need your leftover yarn and a toilet paper tube or a paper towel tube.
That's all.
This is probably the best way I've seen to make a centre pull ball of yarn ever. It all started when I stumbled across a youtube video, it made great sense. So I figured I would do my own tutorial for funsies. Alright first lets talk about what kind of skeins you should wind and which ones to avoid. I found this out the hard way when I was making a blanket and the baby yarn I was using wasn't being sold anymore in stores, so I decided to frog the whole thing. Ok great. Except it was nearly half a skein of baby bernat sport, so the better part of 400 yards at least. I only had a toilet paper tube and it became quite a large undertaking. So if you have a large skein to wind, use a paper towel tube you will be happier. Alright so I have a few ( snorts) skeins laying around that need winding.

Ok so here are some examples of left over skeins you may (ok you do have) laying around your house/craft room.  I don't recommend the pink one since it has form and in general isn't falling apart and the cake would be too big for the toilet paper roll, but the other three are perfect candidates. Let's get started. 

So here is my toilet paper roll. I gave myself a note so I know which way is top because well sometimes we all forget, as well as notes to the other people in my household to not touch it or toss it.  The only time they care about cleaning up is when I have things that they shouldn't touch laying around. ( i'm trying to make it their fault because well it is. LOL)

Alright, I made a small slit in the top. This isn't necessary, but I prefer it. It keeps the yarn in place and I don't have to hold it inside the tube, killing my hand and fingers in the process ( i forgot a picture, but essentially I just put one end of the yarn thru the tube then slide it into the slit to hold it in place. ( jeez that sounds so dirty sorry y'all)

Then I start winding

Now I like the more cake look if you will, so after a few wraps just wrapping it around the tube, I do it at an angle where I bring the yarn around the top and cross it down the bottom, after a few wraps I rotate the tube a little and keep going, you'll see how it turns out in a few pictures. But you can just do a traditional wind, or however you like. :)

See how it's kinda criss-crossing. 

see what I mean. :)

Ok so when you are done you have this little tail. 

I just get my hook and go under some of the yarn and pull it thru

There wasn't enough so I went under another section to make sure the tail stays tucked


now you can just slide it off the tube. This is where I had trouble with my first one. I had so much yarn and it was so big and tight, it was a nightmare getting it off the tube. Testimony that smaller bits of yarn work better as this slid right off.


and there you have it a nice little yarn cake/ball with a centre pull.

now I'm just bored and wanted to take pictures. 

isn't this pretty?


I hope this helped you, and if need a video I linked the one I originally watched at the top of the page. :) Have fun winding!!


Thursday, May 29, 2014

Summer.

School is out, summer is in full swing. I decided that I am going to finally make myself a granny square blanket. I've made grannies before, usually for swaps or giant grannies for other people, but never for myself. Originally I was going to make a Babette. For those that don't remember the babette craze, that inspired CAL's ( crochet a-longs) all over the interwebs, let me take a stroll down memory lane. Picture this, sicily 1912..... Well not really, more like the internet, 2006.  Ok so in 2006 interweave crochet magazine published a pattern called the Babette designed by Kathy Merrick. The design itself was simple, solid granny squares in various sizes put together to look like a patchwork quilt.
This blanket made people go crazy. They couldn't keep the issue on the shelves and in the end they put out a digital pattern for it. So the big thing with this blanket is the placement of squares.The pattern includes a diagram, and a detailed chart with which squares can be made with which colours. The pattern is a genius pattern, the biggest issue with the original is that it the designer used Koigu wool. Which is very pricey, and also uses small hooks. The original blanket calls for 17 different colours of wool using a C and E hook. Now, if you have never crocheted before, the C and E hooks are small, like really small. They make small stitches. First I crochet tightly in general, and this blanket is quite small already, so this means using the yarn weight and hook sizes suggested my toddler's dolls would have a lovely blanket. I wanted to make a new template, but this involves being a puzzle maker.
Which of course as we all remember from the bobbin post I am no puzzle maker. I tried. I failed. It wasn't pretty. Also this blanket is made with solid granny squares and with solid granny squares you would have to make each square and then sew them together when you are done. In the immortal words of grumpy cat:
I decided to troll ravelry ( FYI I know I 'm using troll incorrectly here, but don't care LIVE WITH IT) and the finished babettes to get ideas. And boom, angels sang, light shone, a heavenly choir the whole thing. Someone ( Maryfairy) so lovely made a square chart for me to follow and made the most beautiful blanket, she called it a cross between the Nanny McPhee blanket ( which is the traditional granny square type blanket) and babette. GENIUS.  (Link to Maryfairy's project) I love this woman, seriously I do. Because she included a chart so I wouldn't have to. Love.

Anyway... I decided this was it, I was going to do this and this would be my blanket. MINE. Not yours. Mine. So let me present to you my granny mcphee in progress.

Because it is summer I decided being outside at the park is the way to go with this blanket. 


see at the park enjoying the day.

So I have a love affair with Vanna's Choice. 

Impeccable isn't bad either

I'm not sure on the colour next to the yellow, I'm holding it to see if it grows on me. I haven't used it yet, but we will see. 


I have 29 skeins of yarn. I'm going through my yarn stash to kinda bust it ( really so I can buy more yarn *snickers*) I really wanted my blanket to have a common theme of colour and not be a funky mishmash of colours that make no sense. ( which is why I'm still holding that one colour, not sure if it goes with my flow) * side bar* this is why I love Vanna's Choice, all of the colours go together no matter which ones you pair together they look great together. /love of Vanna's Choice

So here I am right now. I am loving the join as you go. No squares hanging around getting lost, as soon as I make it, it goes on the blanket. It feels like I'm making progress every time I finish a square.

If anyone is interested in following my progress on Ravelry, here is the link to my blanket on ravelry.  


**disclaimer, it is late, I'm late night blogging, this leads to potential incoherent thoughts and sentences that probably make sense in my tired state, but won't when I'm fully awake. I apologize and will fix it in the morning.**


Monday, May 5, 2014

DIY: Homemade yarn bobbins

I've been into making graphghans lately. Or I should say I've been into thinking about making graphghans, as I look at the pile of projects I have still to make. Well at any rate, I figured I would get ready to make one by getting my yarn bobbins together. I'm cheap #1, so I have a bunch of embroidery thread bobbins, which while they work ok, they are small and don't hold much yarn. I wound up google searching to see if there was a way to make DIY bobbins and there are few, so I decided to try my hand at making my own. So here we go: Warning, there are a ton of pictures.

This is a traditional thread bobbin

While it works well as you can see the yarn slips off and it can't hold nearly as much yarn.

Unlike a DIY cardboard bobbin

You will need the following materials.

a cardboard box, I used one of the many priority boxes I have laying around. You want a box that will be stiff enough to hold its shape and not bend with yarn wrapped around. 


I used one template and simply enlarged it to get two different sizes. (This is linked at the bottom of the blog.)

a cutting board or any surface that you don't mind getting messed up. This is my no food craft cutting board.

an exacto knife, this can be optional because you can use scissors, but I find the knife to be far more efficient, scissors and a pencil.

you want to take your box and cut it on the seam so that the box will open flat.

see.

It will be a bit easier to cut it once it is opened rather than fiddle with it while it is whole.

you'll want to cut each section,

so you will have 4 different pieces of cardboard

now you may be a puzzle genius and know exactly how to get the most bobbins out of your cardboard. I am not... So yeah, you want to take your templates and trace them onto the cardboard. You may also be better at this than me and I'm cool with that. :)

next you will want to take your exacto knife and at first lightly score your lines. 

then you will want to go back over them until you feel the knife break through the cardboard

as you can see it takes time and a little bit of force

once you have scored/cut enough, you want to start breaking it out. 


nice and easy.

This is optional, but you can cut some notches ( or even just one on each side or whatever you want) to hold the yarn like a regular bobbin.

and boom. there you go, two different sizes of yarn bobbins. 


Here is where I got the bobbin template. I simply saved the image from the page. I can't remember the percentage I used, but you can play around with it until you get the size or sizes you want. 

Hope this was helpful for you!